

This is the third part of the guide to setting up an automated workflow to deploy code to a Kubernetes cluster following a change in a git repository. The first two parts of this series so far belong in the dev portion of devops. They encompass what most software engineers do to build and test their code locally. This next step builds a bridge from local deployment to a remote deployment such as a Kubernetes cluster in the cloud. However, to follow the guide, you do not need a cloud-based cluster, you can use a local cluster such as Minikube. The process of deploying is nearly identical.
If you do not have minkube or some other Kubernetes cluster (Kind, MicroK8s, etc.) that you can deploy to, then set one up before proceeding.
In order to deploy to Kubernetes, we need manifest files that tells the cluster a few things about the application, such as where to get the image at the very least. We could create the manifests from scratch, but Helm offers an alternative that creates more flexible, templated files. It is very easy, just enter the command:
helm create <name>Code language: HTML, XML (xml)The value for <name> can be anything. I used allo-k8s. This value is then used throughout the templates for application name and labels. However, in the context of a project, I rename the directory to helm or helm/<service> to make it clear that the directory holds helm charts:
mkdir helm
mv allo-k8s helm
After running the above commands, the directory tree looks something like this:
/
├─ helm/
│  ├─ allo-k8s/
│     ├─ charts/
│     ├─ templates/
│     │  ├─ deployment.yaml
│     │  └─ service.yaml
│     ├─ Chart.yaml
│     └─ values.yaml
├─ allo/
│  ├─ __init__.py
│  └─ main.py
├─ Dockerfile
├─ requirements.txt
└─ uwsgi.ini
Once we have the base helm directory, we can customize the files it generated for our purposes. First, we want to use a digest as part of the image name for the development environment, since the branch or pull-request values may not change with each build. The digest ensures that each deployment has a unique tag, that the correct image is used, and it makes it easy to check which image is active if you come back to the project after a couple days. For this we modify the templates/deployment.yaml file by replacing the line for the image field from:
image: "{{ .Values.image.repository }}:{{ .Values.image.tag | default .Chart.AppVersion }}"Code language: plaintext (plaintext)to
          {{- if .Values.image.digest }}
          image: "{{ .Values.image.repository }}:{{ .Values.image.tag | default .Chart.AppVersion }}@{{ .Values.image.digest }}"
          {{- else }}
          image: "{{ .Values.image.repository }}:{{ .Values.image.tag | default .Chart.AppVersion }}"
          {{- end }}
Code language: plaintext (plaintext)
Next, for clarity of understanding, we add the digest field to the values.yaml file. After the changes it should look as follows:
image:
  repository: ghcr.io/skiscontent/allo-k8s
  pullPolicy: Always
  # Overrides the image tag whose default is the chart appVersion.
  tag: ""
  # specify the image digest to use
  digest: ""Code language: YAML (yaml)
The values for tag and digest will be filled in by the CI/CD pipeline.
While we are in the values.yaml file, let’s also configure the access to the image repository. We will tell the Kubernetes controller that it should look for the registry credentials in a secrets resource called ghcr-regcred:
imagePullSecrets:
  - name: "ghcr-regcred"Code language: JavaScript (javascript)
Next, we need to push the image to the github container registry (ghcr.io). If you have not already done so, set up a Github account and create a Github personal access token (PAT).
Log into the registry with the PAT, tag the local image with the remote repository information, and push the image to the repository.
export PAT=YOUR_TOKEN
echo $PAT | docker login ghcr.io --username <username> --password-stdin
docker tag allo-k8s ghcr.io/<username>/allo-k8s:0.1.0
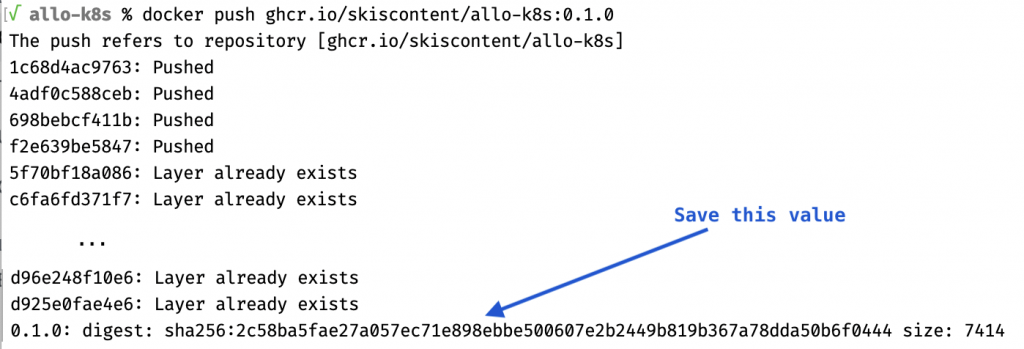
docker push ghcr.io/<username>/allo-k8s:0.1.0Code language: Bash (bash)Assuming that everything worked as expected, the image should now be available from the ghcr.io repository. The last line of the output from the above command should contain an image digest, as in the screenshot below. Copy the digest value and save it in a text note or document for use later.
Next we need to prepare the cluster. Specifically, we need to upload the Github registry credentials. If you have not already done so, set up a cluster and kubeconfig so that you can use kubectl to access the cluster. If the current kube context is not set to the cluster you want to use, remember to specify --context <desired-context> for kubectl and --kube-context <desired-context> for helm. The following will create a secrets file with the registry credential:
kubectl create namespace allo-k8s
kubectl create secret -n allo-k8s docker-registry regcred --docker-server=https://ghcr.io --docker-username=<username> --docker-password="$PAT" --docker-email=<your-email>Code language: Bash (bash)
Now we are ready to deploy the app to the cluster.
helm install allo-k8s helm/allo-k8s -n allo-k8s --set image.tag=0.1.0 --set image.digest=sha256:2c58ba5fae27a057ec71e898ebbe500607e2b2449b819b367a78dda50b6f0444Code language: Bash (bash)Barring any issues, you should see results similar to the following:

Check that the pod is running with kubectl get pods -n allo-k8s (this is comparable to docker ps–in fact, run docker ps and stop the allo-k8s container in Docker if it is running so that you don’t have contention over the deployment port):

We can also check that the service exists:

Since we did not set up an ingress, we need to set up a port forward in order to connect to the service:
kubectl port-forward service/allo-k8s -n allo-k8s 8080:80You should see:

Reload the page in the browser that’s pointing to http://localhost:8080 (or open a new page) and you should see the hello message again. Just to confirm that it came from the pod, try this url: http://localhost:8080/?problem=me. The message shouldn’t change, but now let’s verify that the request went to the pod by fetching the pod logs and filter them (otherwise you may get a LOT of log lines) through grep to look for “problem” .
kubectl logs allo-k8s-75fcbb68d4-xd6ks -n allo-k8s | grep problemThere should be a couple of lines like this:

Voilà! You have now deployed an app to a Kubernetes cluster. Small win number three!
We now have an application that we have packaged into a container and we have deployed the container both to Docker and to a Kubernetes cluster. We did this with commands in a terminal. In the next part, we will start automating these tasks so that they run automatically.