
The first article in this series introduced our objective, which is to create an automated workflow that delivers code to a runtime environment once it has been committed to a Git repository. In this part we will look at the next step, which is to package the app so that it can be run in a container. We will use Docker as it is the most common tool. If you have not already installed Docker Desktop, download and install it.
In order to build a Docker image, we need a Dockerfile.
FROM tiangolo/uwsgi-nginx-flask:python3.9

WORKDIR /app
COPY ./allo /app/allo
COPY ./requirements.txt /app/requirements.txt
COPY ./uwsgi.ini /app/uwsgi.ini
RUN pip install --no-cache-dir --upgrade -r /app/requirements.txt
Code language: Dockerfile (dockerfile)
This Dockerfile uses the base image tiangolo/uwsgi-nginx-flask:python3.9. This is a convenient base image that already has nginx and uwsgi installed, so there is nothing else to install at the system level. However, in order to deploy the app, we still need to install Flask within the image, and we need to tell uwsgi where the code lives. For this we need to create two additional files. Although the requirements.txt file is strictly not necessary in this case because we are installing a single library, it is a best practice that will be useful if the project grows.
requirements.txt
Flask==2.2.3uwsgi.ini
[uwsgi]
module = allo.main
callable = app
master = trueCode language: JavaScript (javascript)
This is probably a good time to talk about the directory structure. My project directory is called allo-k8s, but yours can be something else. The code examples in this article expect the following structure within that project directory:
/
├─ allo/
│  ├─ __init__.py
│  └─ main.py
├─ Dockerfile
├─ requirements.txt
└─ uwsgi.iniCode language: plaintext (plaintext)
The Dockerfile first instructs Docker to copy several files into an in-container directory called /app. It then tells Docker to run the pip command to install the libraries in requirements.txt, which consists of Flask v2.2.3 (we could also leave the version out to get the latest one). The command will run within the container, and once it completes, the container will be stopped again. The base image expects to find a uwsgi.ini file that tells uwsgi what module code to run. This file says the code is in the allo.main Python module.
Build my image up
Let’s build the image! Make sure Docker is running on your device (If it is not, you will get an error message similar to this when you run the command below: Cannot connect to the Docker daemon at unix:///Users/skiscontent/.docker/run/docker.sock. Is the docker daemon running?). From the project root directory, run the following command:
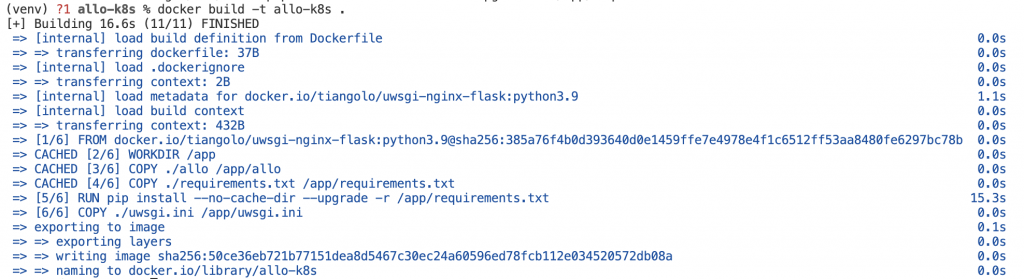
docker build -t allo-k8s .While docker build is running, you may see intermediate output from pip as it installs Flask and its dependencies. Once it completes, you should see output similar to this:
Confirm that the image is present with the command
docker image lsYou should see the image at the top of the listing (as it is the most recent)

Okay, time to run the image. Enter the following command:
docker run -p 8080:80 allo-k8sCode language: CSS (css)In response you should see an output containing a long string (64 characters) representing a hexadecimal number. You may see, WARNING: The requested image’s platform (linux/amd64) does not match the detected host platform (linux/arm64/v8) and no specific platform was requested. It has to do with the CPU type of your device), but it is okay, the image will still work.
Go back to your browser and refresh the page for http://localhost:8080 and you should again see the same hello message. Chalk up our second small win!
Of course, the goal is not to build images by hand, but this step validates that the code works and the container image produced by the Dockerfile can be used. In the next article we will start automating the steps.