

Back in my C++ days, I knew most of the ins and outs of make, and makefiles and sub-makefiles. I could do pretty much whatever I needed to. Of course, in complicated projects the files start looking really ugly inside. Then for Java there was ant, which tidied up all the targets and dependencies in structured XML, but it was the same idea. For my latest Python projects I’ve just been using my IDE’s deploy tools or a shell script that I wrote to scp (that’s file copy over ssh) a tar or zip file to the deploy machine, and another script there to actually deploy the files, run db sync, etc. It works.
Makefiles are still the way to go for C-like projects, but the software development world has moved on to newer tools, especially for web deployments. One that is frequently mentioned is Ansible. I thought I’d give it a try. I quickly found myself frustrated because there’s no really quick get-started guide that I could find that actually got me up and running. So as I was figuring it out, I decided to document the steps, perhaps it may help others. [I originally started this post in 2018, but I did not complete. I never used ansible for work, and forgot everything! So this has been a re-learning.]
Get Ansible
The ansible docs page does contain download instructions for a number of systems, so I’m not going to repeat those here. Ansible is a Python-based tool, so if you’ve got Python, chances are you have pip. Therefore the easiest way to install it is:
pip install ansible
If you do not want to install this into your default Python environment, then create a separate virtual environment. I prefer to keep them separated.
Does it work? Try the following command: ansible -m ping localhost
(ansiblevenv) skiscontent ansible % ansible -m ping localhost
[WARNING]: No inventory was parsed, only implicit localhost is available
localhost | SUCCESS => {
"changed": false,
"ping": "pong"
}
At least the command works. Small wins!
Get Some Inventory
Inventory is Ansible parlance for the target machines where you want to deploy your code. If you have a test server, use that. If you’re doing it on the production server, I don’t think it’s a good idea, but the next few steps won’t break anything, so if you want to, go ahead.
So let’s ping an actual host. The ansible getting started guide says you need to edit /etc/ansible/hosts. I prefer not to edit a system-wide settings file for my personal use, so instead, I created a file called hosts in the working directory:
[staging]
mystaging.com
(ansiblevenv) skiscontent ansible % ansible -i hosts -m ping staging
mystaging.com | UNREACHABLE! => {
"changed": false,
"msg": "Failed to connect to the host via ssh: skiscontent@mystaging.com: Permission denied (publickey).",
"unreachable": true
}
Let’s break this down. When using an inventory file different from the default location, you need to specify the -i INVENTORY option, so that is what -i hosts does. Then I specified the staging inventory group. I could have also specified my one host directly ansible -i hosts -m ping mystaging.com.
The command failed because Ansible uses SSH to connect to remote hosts and I did not provide the valid username and SSH private key. So let’s fix that by adding some values to the hosts file:
[staging]
mystaging.com ansible_user=ubuntu ansible_ssh_private_key_file=/Users/skiscontent/.ssh/id_rsa
Now try the ping command again. Be patient. It can take a few seconds.
(ansiblevenv) skiscontent ansible % ansible -i hosts -m ping staging
mystaging.com | SUCCESS => {
"ansible_facts": {
"discovered_interpreter_python": "/usr/bin/python3"
},
"changed": false,
"ping": "pong"
}
Success!
Before we go further, let’s make a couple of adjustments. At present the inventory file is in a simple INI format; for more advanced concepts (such as separate host and group variables files), we will need to use YAML. So let’s convert over now. The same hosts file in YAML format would be hosts.yml:
staging:
  hosts:
    mystaging.com:
      ansible_user: ubuntu
      ansible_ssh_private_key_file: /Users/skiscontent/.ssh/id_rsa
The [pre]hosts[/pre] key is necessary. Other possible values are “vars”, and “children”. The “children” key makes it possible to create sub-groups.
all:
  children:
    group-a:
      children:
        staging:
          hosts:
            mystaging.com:
              ansible_user: ubuntu
              ansible_ssh_private_key_file: /Users/skiscontent/.ssh/id_rsa
        production:
          hosts:
            myproduction.com:
              ansible_user: ubuntu
              ansible_ssh_private_key_file: /Users/skiscontent/.ssh/id_rsa
    group-b:
      hosts:
        group-b-1.com:
        group-b-2.com:
      vars:
        ansible_user: ubuntu
        ansible_ssh_private_key_file: /Users/skiscontent/.ssh/private-b.pem
The following are all possible ways to target the hosts:
ansible -i hosts.yml -m ping all         # this will target all 4 hosts
ansible -i hosts.yml -m ping group-a     # this will target 2 hosts: mystaging.com, myproduction.com
ansible -i hosts.yml -m ping staging     # this will target mystaging.com
ansible -i hosts.yml -m ping production  # this will target myproduction.com
ansible -i hosts.yml -m ping group-b     # this will target 2 hosts: group-b-1.com, group-b-2.com
Finally, it is also possible to nest inventory files in directories, and specify only the top-level directory. You can also set an ANSIBLE_INVENTORY environment variable with a comma-separated list of inventory sources (directories, static files and .py files!).
Let’s cook!
A Practical Example
Okay, now that we have inventory, let’s do something. I like practical examples, so I set myself this task: I have a Django app and to distribute it, I check out the code from a git repo, delete the git artifacts and other unnecessary files, then I copy the files to the Apache-configured distribution directory. I also have to run migrations and deploy static files. I have a bash script that does all this, but now I want to do it with Ansible.
Here is the bash script that I currently use:
#!/bin/bash
cd /home/ubuntu
rm -rf /home/ubuntu/JobFun
git clone --depth=1 https://github.com/SKisContent/JobFun.git
rm -rf JobFun/.git
rm -f JobFun/.gitignore
rm -f JobFun/README.md
rm -f JobFun/LICENSE
sudo su -l jobfunapp -c "cd /var/www/JobFun ; ./manage.py maintenance_mode on"
sudo cp -R /home/ubuntu/JobFun /var/www
sudo chown -R www-data.www-data /var/www/JobFun
sudo find /var/www/JobFun -name "*.pyc" -type f -delete
sudo su -l jobfunapp -c "cd /var/www/JobFun ; pip install -r requirements.txt"
sudo su -l jobfunapp -c "cd /var/www/JobFun ; ./manage.py migrate"
sudo su -l jobfunapp -c "cd /var/www/JobFun ; ./manage.py collectstatic -v 0 --noinput --clear"
sudo apachectl graceful
sudo su -l jobfunapp -c "cd /var/www/JobFun ; ./manage.py maintenance_mode off"
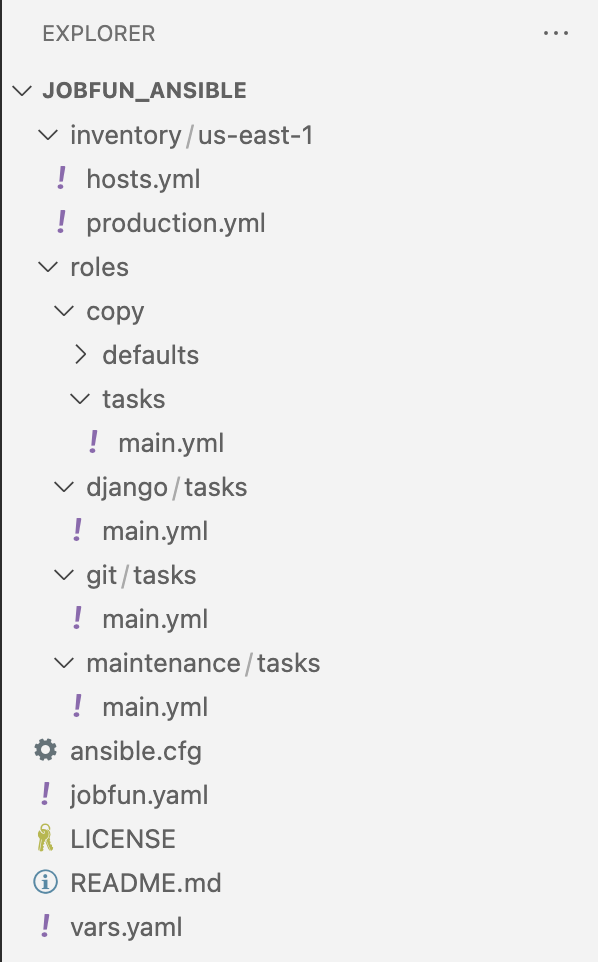
Code language: Bash (bash)Each of those actions (git, delete file, copy files and Django commands) will be converted to Ansible tasks, which use Ansible modules, and, tied together to achieve a goal, they compose an Ansible playbook. So far, I have used the ping module to perform the task of SSH connecting to a remote host. Let’s explore some other Ansible modules. The code for the rest of this guide can be found on GitHub. For reference, here is the directory tree:
Like any programming project, creating Ansible playbooks requires breaking down the larger objective into smaller ones. Here is the jobfun.yaml playbook file:
---
- name: Deploy
  hosts: staging
  vars_files:
    - vars.yaml

  roles:
    - git
    - role: maintenance
      become: true
      become_user: jobfun
      vars:
        mm_state: "on"
    - role: django
      become: true
      become_user: jobfun
    - copy
    - role: maintenance
      become: true
      become_user: jobfun
      vars:
        mm_state: "off"
Code language: YAML (yaml)
This playbook contains one play, named Deploy. It sets up the hosts on which this playbook should be applied, tells Ansible where to find variables, and then lists the roles that need to be applied. The hosts entry tells Ansible which inventory should be targeted for this play. In Ansible, as with other code, variables are used in place of the actual value, so that if the value needs to be changed, the actual code doesn’t have to be changed. We’ll see this in use below. Ansible roles are a set of tasks that usually have some cohesion of purpose, and, more usefully, can be invoked multiple times and can be shared with others. More on roles further below as well.
Certain aspects of an Ansible project structure are constrained by conventions, while others are open. So, for example, Ansible does not specify which file or folder should contain the inventory definitions. However, Ansible needs a way to identify inventory. This can conveyed via the ansible.cfg file:
[defaults]
inventory = inventory
Code language: TOML, also INI (ini)
This tells Ansible that the inventory can be found in the inventory folder. The name of this folder is actually arbitrary and it could have been named stockroom or gajpwego.
Talk about a role!
On the other hand, the roles directory has special meaning. It is where Ansible looks for roles (like with most things Ansible, this can be overridden). Roles are a set of tasks that can be reused. Each role is contained in a child directory of roles, and Ansible expects it to contain at least one of these subdirectories:
defaults/
files/
handlers/
library/
meta/
tasks/
templates/
vars/
If a particular subdirectory contains content, it must be in a file called main.yml (or main.yaml). In the jobfun_ansible project, the git role contains this tasks/main.yaml content:
---
- name: Delete directory
  ansible.builtin.file:
    state: absent
    path: "/home/ubuntu/JobFun/"

- name: Clone from repo
  ansible.builtin.git:
    repo: https://github.com/skiscontent/JobFun.git
    version: staging
    dest: /home/ubuntu/JobFun
    depth: 1

- name: Delete unwanted files
  ansible.builtin.file:
    state: absent
    path: "/home/ubuntu/JobFun/{{ item }}"
  with_items:
    - .git
    - .gitignore
    - LICENSE
    - README.md
Code language: YAML (yaml)
There are three tasks here. The first one, named Delete directory uses the module ansible.builtin.file, which is part of Ansible core and does not need to be installed separately. The Delete directory tells Ansible that the state of the /home/ubuntu/JobFun directory should be absent, which is how we tell ansible to delete a file or directory.
The next task, Clone from repo, uses the builtin git module to clone a repo into the /home/ubuntu/JobFun directory.
Finally, the Delete unwanted files task makes sure that files and directories that should not be deployed are removed. This task uses an Ansible loop flow control keyword, with_items. The {{ item }} template structure in the path: element refers to each of the items listed under with_items.
Modules From Here and There
In the git role, the tasks were defined in a built-in module. The Django role uses a module that is maintained by the Ansible community. This is the task/main.yml file:
---
- name: Requirements
  ansible.builtin.pip:
    requirements: /var/www/JobFun/requirements.txt
    virtualenv: "{{ python_path }}"

- name: Migrate
  community.general.django_manage:
    project_path: /var/www/JobFun
    settings: jobfun.settings
    pythonpath: /var/www/JobFun/jobfun/settings
    virtualenv: "{{ python_path }}"
    command: "migrate"

- name: Static files
  community.general.django_manage:
    project_path: /var/www/JobFun
    settings: jobfun.settings
    pythonpath: /var/www/JobFun/jobfun/settings
    virtualenv: "{{ python_path }}"
    command: "collectstatic -v 0 --noinput --clear"
Code language: PHP (php)
The first task does use a built-in module, the Python utility pip, to install Python dependencies. However, the next two tasks use a module that integrates Django with Ansible. The two tasks run Django’s migrate and collectstatic commands.
Variables Everywhere
Note how the path /var/www/JobFun is repeated multiple times in the previous two role examples. This is a typical case for using a variable instead. That would reduce chances of error and reduce time wasted trying to run a playbook that will fail when the path does not exist (especially with the mixed case in JobFun). It also makes it easier to update the content if ever the path should change. There are many, many ways to use variables in Ansible, including using the defaults directory of the role (see the defaults/main.yml content of the copy role), passing a literal value from the play when invoking the role (see the invocation of the maintenance role in the jobfun.yaml playbook file), declaring the variable in the playbook and declaring the variable in a project-level variables file (see vars.yaml).
An example of passing the variable when invoking the role can be found in the calls to the maintenance task. First, here is the task definition of the role:
---
- name: "Maintenance Mode {{ mm_state }}"
  community.general.django_manage:
    project_path: /var/www/JobFun
    settings: jobfun.settings
    pythonpath: "{{ application_directory}}/settings"
    virtualenv: "{{ python_path }}"
    command: "maintenance_mode {{ mm_state }}"
Code language: JavaScript (javascript)
Here is how the role is invoked:
    - role: maintenance
      become: true
      become_user: jobfun
      vars:
        mm_state: "on"
    - role: django
      become: true
      become_user: jobfun
    - copy
    - role: maintenance
      become: true
      become_user: jobfun
      vars:
        mm_state: "off"

Code language: JavaScript (javascript)
Notice the lines containing mm_state. This is a simple but effective example of how to re-use code with roles.
There’s a lot more to learn, including conditionals, imports and dynamic variables and inventory, but with the example above it is possible to get started and solve real-life problems.