

As someone who builds and maintains cloud infrastructure, I have always been leery from a security perspective of giving 3rd party services, such as CI/CD platforms, access to the resources. All the service vendors claim to take stringent precautions and implement foolproof processes, but still, vulnerabilities getexploited and errors happen. Therefore, my preference is to use tools that can be self-hosted. However, I may not always have a choice if the organization is already committed to an external partner, such as Bitbucket Pipelines or GitHub Actions. In that case, in order to apply some Terraform IaC or deploy to an autoscaling group, there is no choice but to furnish the external tool with an API secret key, right? Wrong! With the proliferation of OpenID Connect, it is possible to give 3rd party platforms token-based access that does not require secret keys.
The problem with a secret is that there is always a chance of it leaking out. The risk increases the more it is shared, which happens as employees leave and new ones join. One of them may disclose it intentionally or they may be the victim of phishing or a breach. When a secret is stored in an external system, that introduces an entire new set of potential leak vectors. Mitigating the risk involves periodically changing the credentials, which is a task that adds little perceptible value.
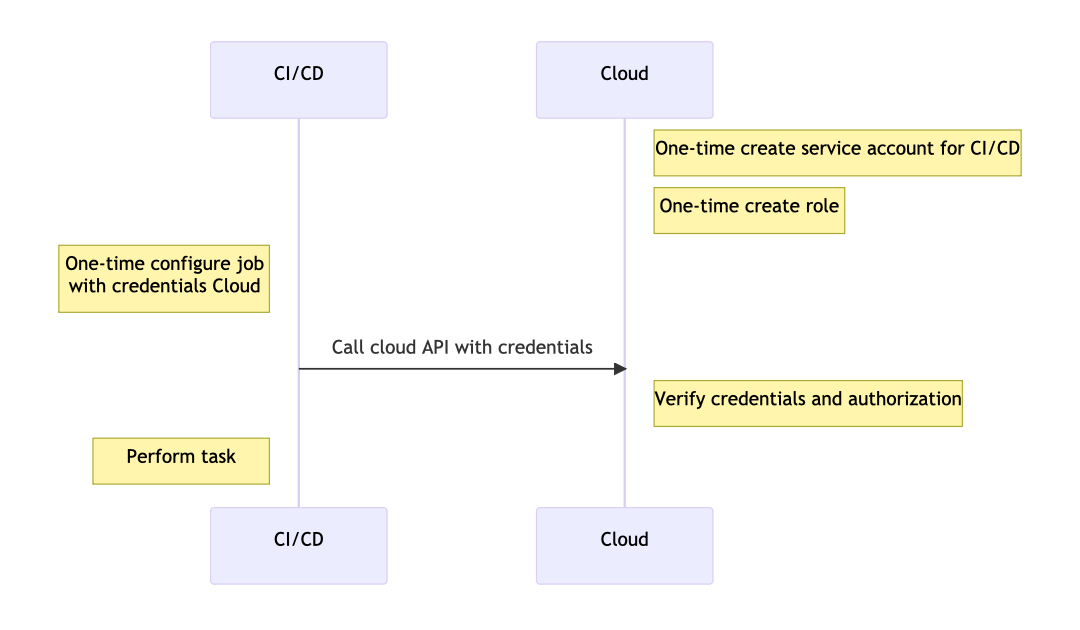
The typical way to authorize a third-party system works like this: We create a user or service account in our cloud provider and generate a username and password or API credentials. Then we save the credentials in the third party platform’s secrets store. Whenever we need the third party platform to perform an action in our cloud provider, like in a build pipeline, we refer to the secrets. The following is a simplified sequence diagram for this configuration:
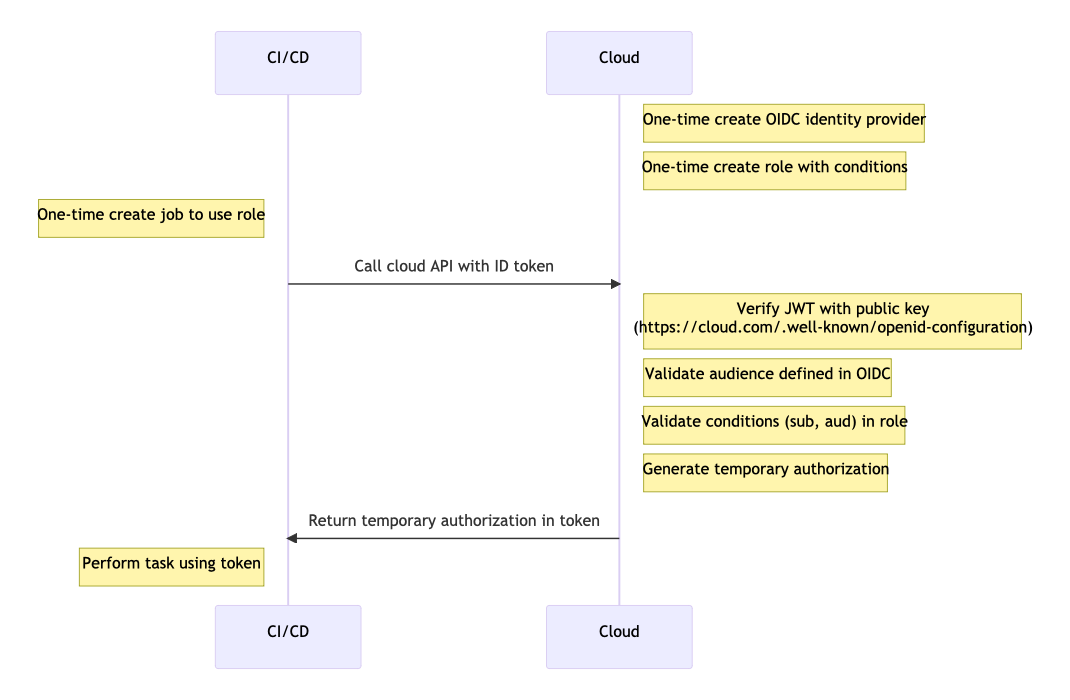
OpenID Connection authorization works differently. A system that is the source of identities is the Identity Provider (IdP for short). The system that needs access to the cloud is the client (also known as the audience). In this situation, the IdP will be the CI/CD platform, such as GitHub, and the client will also be GitHub. The cloud provider receives a request from the client and validates the identity with the IdP. To set this up, first, we tell the cloud provider where to validate identities. In AWS, this involves configuring an OIDC provider. In order for AWS to validate the incoming credentials, it needs the TLS certificate fingerprint of the IdP. In addition, the client must be authorized to perform specific actions (claims). In AWS, this authorization is granted through an IAM role. Finally, the job or pipeline in the CI/CD platform must be configured to use the authorization with the specific cloud provider. So the cloud provider does not necessarily need to know about the CI/CD platform, but the platform must know how to work with the cloud provider. In addition to GitHub, OIDC authorization is supported by GitLab, Circle CI, and Bitbucket. In addition to AWS, other cloud providers that support OIDC include Azure and GCP.
Let’s work through an example of connecting GitHub Actions to AWS. In the rest of this post I will demonstrate the steps to setting up OpenID Connect authentication:
- Configure an identity provider
- Create a role
- Configure the CI/CD pipeline
Set up the Identity Provider
In order for AWS to verify the legitimacy of an an incoming request, it will make an HTTPS request to a URL that knows of the client. AWS verifies the URL by checking the TLS certificate. The full command to get the fingerprint (or thumbprint as AWS refers to it) is:
export THUMBPRINT=$(openssl s_client -connect token.actions.githubusercontent.com:443 -servername token.actions.githubusercontent.com -showcerts 2>/dev/null </dev/null |
 sed -ne '/-BEGIN CERTIFICATE-/,/-END CERTIFICATE-/{/BEGIN/{h;d;};H;};${x;p;}' |
 openssl x509 -inform pem -outform der |
 openssl dgst -sha1)Code language: JavaScript (javascript)
Let’s break this down. The first command in the sequence, openssl, connects to the remote server as a client and fetches information about the SSL/TLS certificate.
- s_client Tells openssl to act as a SSL/TLS client (similar to a web browser, but only for the SSL connection part)
- -connect The remote host and port to which to connect
- -servername Not necessary if the connect option was a DNS name, otherwise needed for TLS server name indication (SNI)
- -showcerts display all the certificates in the chain
- 2>/dev/null send stderror output to /dev/null
- </dev/null send null as input to the command
The result of the command is as follows:
CONNECTED(00000005)
write W BLOCK
---
Certificate chain
 0 s:/C=US/ST=California/L=San Francisco/O=GitHub, Inc./CN=*.actions.githubusercontent.com
   i:/C=US/O=DigiCert Inc/CN=DigiCert TLS RSA SHA256 2020 CA1
-----BEGIN CERTIFICATE-----
MIIG8jCCBdqgAwIBAgIQCn5zvdee2Vg6XXlzFLM1XDANBgkqhkiG9w0BAQsFADBP
<span style="color: #0000ff;">...</span>
evZ35QEWOlwhphLyHhUL6QFCuAe0wL2arESMXnxgaYE7Ka+SexxEiT5ZmdyrcFwg
BL7FKjOM
-----END CERTIFICATE-----
 1 s:/C=US/O=DigiCert Inc/CN=DigiCert TLS RSA SHA256 2020 CA1
   i:/C=US/O=DigiCert Inc/OU=www.digicert.com/CN=DigiCert Global Root CA
-----BEGIN CERTIFICATE-----
MIIE6jCCA9KgAwIBAgIQCjUI1VwpKwF9+K1lwA/35DANBgkqhkiG9w0BAQsFADBh
<span style="color: #0000ff;">...</span>
as6xuwAwapu3r9rxxZf+ingkquqTgLozZXq8oXfpf2kUCwA/d5KxTVtzhwoT0JzI
8ks5T1KESaZMkE4f97Q=
-----END CERTIFICATE-----
---
Server certificate
subject=/C=US/ST=California/L=San Francisco/O=GitHub, Inc./CN=*.actions.githubusercontent.com
issuer=/C=US/O=DigiCert Inc/CN=DigiCert TLS RSA SHA256 2020 CA1
---
No client certificate CA names sent
Server Temp Key: ECDH, P-384, 384 bits
---
SSL handshake has read 3567 bytes and written 489 bytes
---
New, TLSv1/SSLv3, Cipher is ECDHE-RSA-AES256-GCM-SHA384
Server public key is 2048 bit
Secure Renegotiation IS supported
Compression: NONE
Expansion: NONE
No ALPN negotiated
SSL-Session:
    Protocol  : TLSv1.2
    Cipher    : ECDHE-RSA-AES256-GCM-SHA384
    Session-ID: 943700002B9E436955AF42DC0924EB0F9DC5B1E6617F321CAC1BA2B568ED2890
    Session-ID-ctx:
    Master-Key: ADAC9291D92242641B15A1E9E016519FD0D14A3B066763852360522B01F1A4EDFDB70C7343542B5CE24E3A5EE39FAE98
    Start Time: 1684635042
    Timeout   : 7200 (sec)
    Verify return code: 0 (ok)
---
Code language: HTML, XML (xml)
AWS uses the hash “thumbprint” of the CA that the identity provider uses to sign the HTTPS responses. If AWS pinned the hash of the signing certificate itself, then we would need to keep updating it every time the certificate changed/expired. The CA should change less often. AWS uses the last certificate in the chain, which the next command in the sequence finds.
sed -ne '/-BEGIN CERTIFICATE-/,/-END CERTIFICATE-/{/BEGIN/{h;d;};H;};${x;p;}'Code language: JavaScript (javascript)The sed command does the following:
- -ne The -n option tells sed not to print the pattern space; the -e option is followed by the regex expression
- /-BEGIN CERTIFICATE-/,/-END CERTIFICATE-/ matches the range of lines starting with -BEGIN CERTIFICATE- and ending with -END CERTIFICATE-
- {/BEGIN/{h;d;};H;};${x;p;}
- { … } group commands together
- /BEGIN/ match a line with BEGIN in the pattern space
- h replace the contents of the hold space with the contents of the pattern space
- d delete the contents of the pattern space
- H append a newline and contents of the pattern space to the hold space
- ${x;p;} at the end of the file, x swaps the hold space and the pattern space and p prints the pattern space
The output of this command in the sequence is the last certificate in the openssl information (abbreviated for conciseness):
-----BEGIN CERTIFICATE-----
MIIE6jCCA9KgAwIBAgIQCjUI1VwpKwF9+K1lwA/35DANBgkqhkiG9w0BAQsFADBh
<span style="color: #0000ff;">...</span>
8ks5T1KESaZMkE4f97Q=
-----END CERTIFICATE-----Code language: HTML, XML (xml)
The third command in the sequence again uses openssl:
openssl x509 -inform pem -outform derThis command outputs the x509 value of the certificate in binary format (-outform der), taking as input the pem format (inform pem). The binary output is mostly unprintable.
openssl dgst -sha1This final command calculates the sha1 digest of the input. The result is:
6938fd4d98bab03faadb97b34396831e3780aea1Create a role
Now that we have the thumbprint, we can create the identity provider in AWS.
aws iam create-open-id-connect-provider \
--url https://token.actions.githubusercontent.com \
--thumbprint ${THUMBPRINT} \
--tags Key=created-by,Value=sushil Key=environment,Value=development

aws iam create-role \
--role-name github-actions-role \
--assume-role-policy-document \
'{
  "Version": "2012-10-17",
  "Statement": [{
    "Effect": "Allow",
    "Principal": {
      "Federated": "arn:aws:iam::ACCOUNT_ID:oidc-provider/token.actions.githubusercontent.com"
    },
    "Action": "sts:AssumeRoleWithWebIdentity",
    "Condition": {
      "StringEquals": {
        "token.actions.githubusercontent.com:aud": "sts.amazonaws.com"
      },
      "StringLike": {
        "token.actions.githubusercontent.com:sub": "repo:SKisContent/intuitive:*"
      }
    }
  }]}' \
--description "Role for github actions" \
--tags Key=created-by,Value=sushil Key=environment,Value=development

aws iam attach-role-policy \
--role-name github-actions-role \
--policy-arn arn:aws:iam::aws:policy/PowerUserAccess
The first command configures an OIDC provider. We furnish the provider URL and the thumbprint. If we did this in the AWS console, the AWS console client would calculate the thumbprint for us.
The second command creates a role. The assume-role-policy-document, which is also referred to as the trusted entity in the console, tells AWS that the principal using the role is a federated identity. We also specify some conditions that must be met by the request. The first is that the aud value must be sts.amazonaws.com. The second condition requires the sub value to match the wildcard string repo:SKisContent/myrepo:*. These values (called claims) are sent in a JWT that accompanies the inbound request. The JWT may include several other claims and depends on the platform. Breaking down the sub claim above, it says that the GitHub organization must match SKisContent and the repository must match myrepo. We could also specify branches or tags, but in this case we allow them all using an *as a wildcard. We want to define the conditions that the claims must meet as narrowly as possible while still allowing flexibility if we want to allow multiple branches or even repositories.
Configure the CI/CD pipeline
Finally, we create the GitHub action. A simple .github/workflows/main.yaml file in a repository for a Terraform project might look as follows:
name: Plan on pull-request to main
on:
  pull_request:
    branches:
      - main
    types: [opened, synchronize, reopened]
jobs:
  plan:
    name: Plan
    runs-on: ubuntu-latest
    permissions:
      id-token: write
      contents: read

    steps:
      - name: Check out code
        uses: actions/checkout@v3

      - name: Setup Terraform
        uses: hashicorp/setup-terraform@v2
        with:
          terraform_version: 1.4.5

      - name: Configure AWS Credentials
        uses: aws-actions/configure-aws-credentials@v2
        with:
          role-to-assume:arn:aws:iam::ACCOUNT_ID:role/github-actions-role
          role-session-name: githubrolesession
          aws-region: us-east-1

      - name: Initialize Terraform
        run: |
          terraform init -input=false

      - name: Plan Terraform
        id: plan
        continue-on-error: true
        run: |
          terraform plan -input=false -no-color
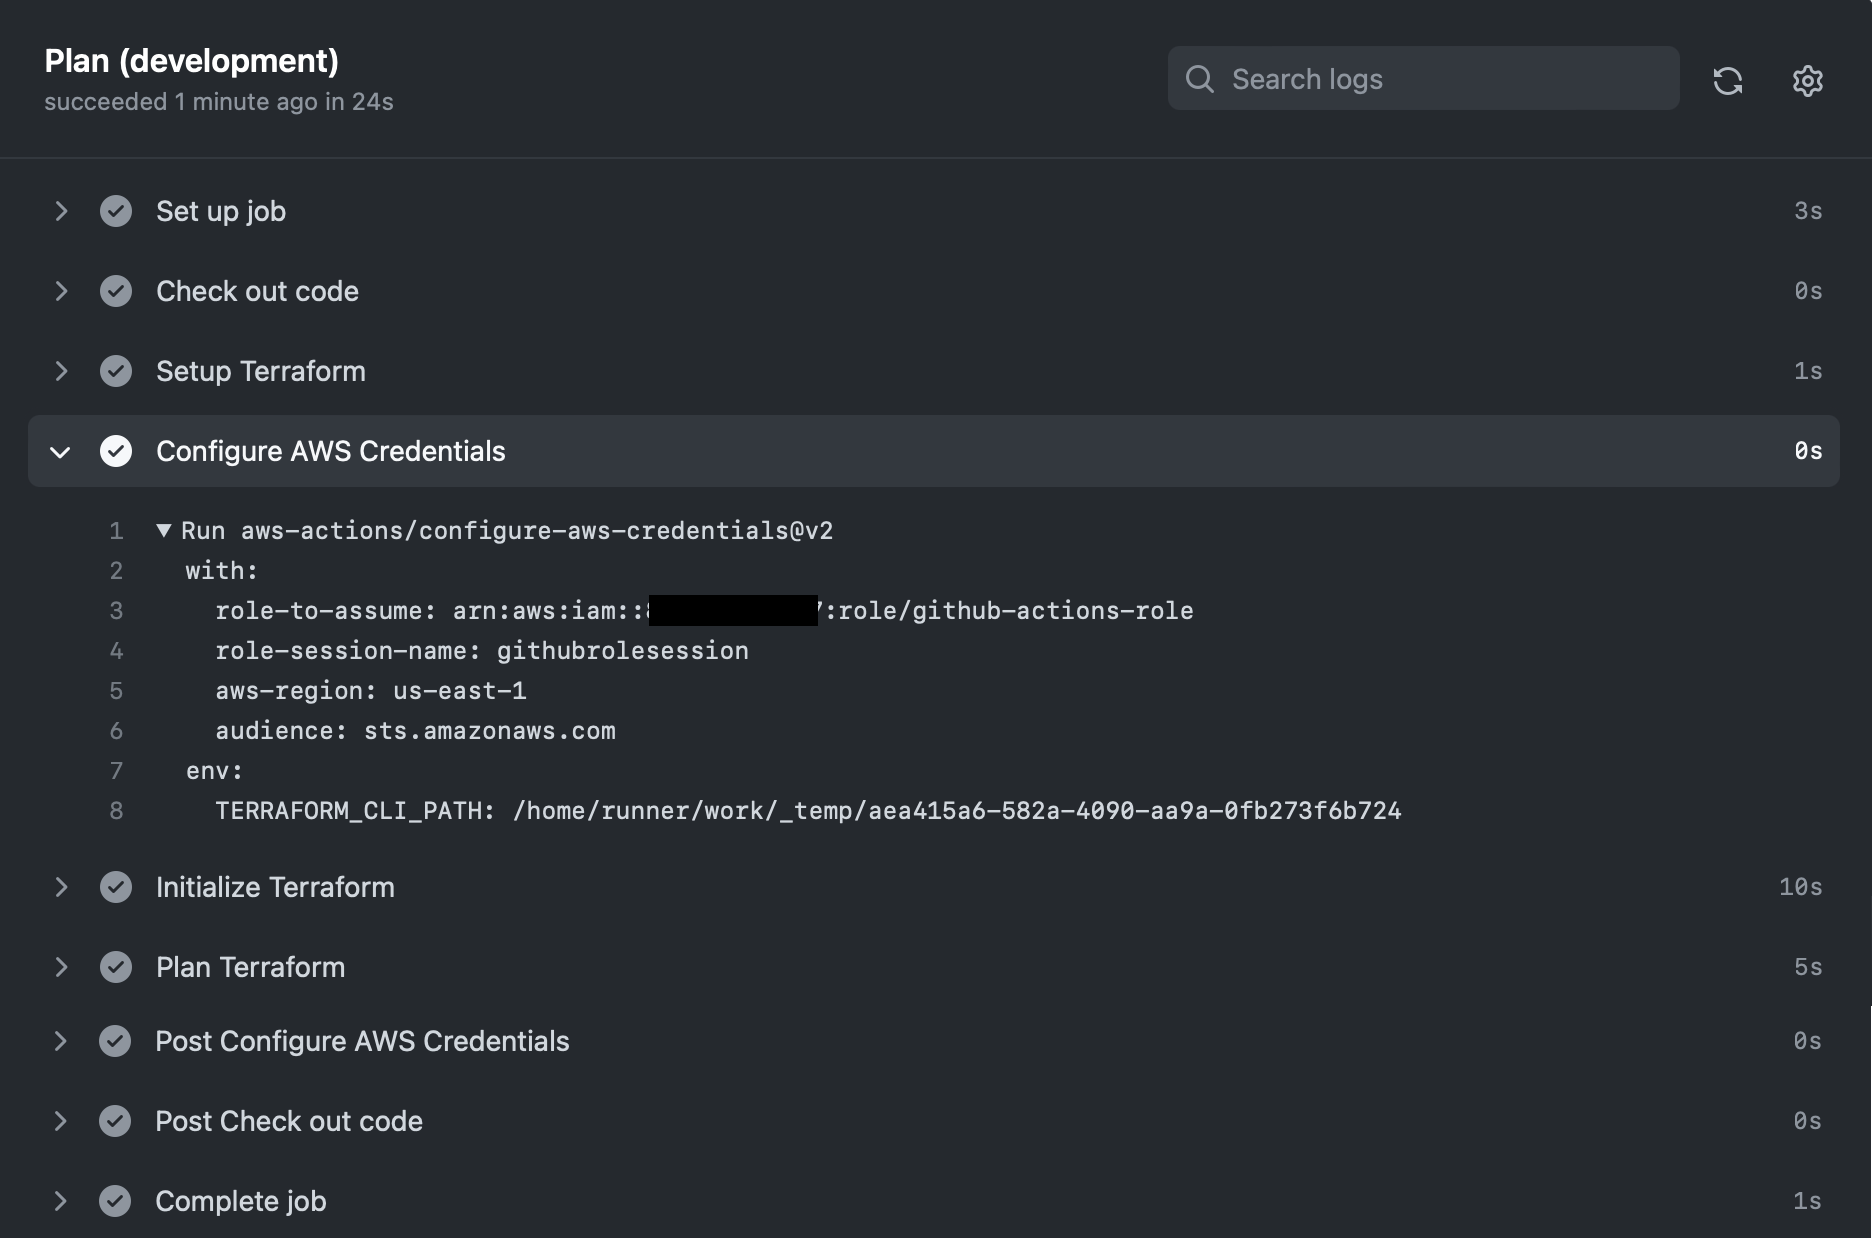
We use the predefined configure-aws-credentials action to connect the workflow to AWS. When we run the action, we will see the results below. The expanded section shows the task that connects to AWS and fetches the temporary credentials that will be used as needed.
.